Frequently Asked Questions
- How can I invite participants to events?
- How can I personalize invitations?
- Can I invite more participants after creating the event?
- Can I automatically invite my most important customers first?
- Can I automatically invite more guests when there are few replies?
- Why haven't all my invitations been sent out yet?
- Innovative invitation methods - how does it work?
- How can I define who is invited first?
- If an e-mail address appears in two invited groups, is the invitation sent twice?
- Can interested parties register themselves for regular events?
- I have unsubscribed from emails from an event organizer. How can I resubscribe to these invitations?
- How can I manually add people to the participant list?
- How can I permanently delete people from the participant list?
- Can I filter the participant list to show only people who have accepted (or declined) the invitation?
- Who should be able to see the participant list?
- How can I view participation statistics for multiple events?
- I have no e-mail address or do not want to use my private one
- Why is my email address shown as invalid?
- I want to allow multiple registrations with one e-mail address
- How does the waiting list work and where can I activate it?
- Can I preselect event participants?
- How long can participants register for events or cancel their participation?
- Can participants still register during the event (after the event has started)?
- How does the check-in work?
- Where can I find the QR code for event registration and how does it work?
- How can I add registration fields?
- How can I customize the design of my events?
- Can I store different designs and registration fields for different events, templates or series?
- Why are some fields on the event registration page already filled out?
- What are the dimensions of the event image?
- How can I change the small round image below the date of each event?
- I receive so many e-mails - can I deactivate them?<
- How can I automatically send the link to my online meeting to all participants?
- Can I define the text of the confirmation emails myself?
- How can I contact the event organizer?
- When does Let's Meet send out reminders?
- What can you offer for multiple organizers managing events?
- How is the limit for event registrations and invitations calculated?
- Does my free trial period for the basic package end automatically?
- Can I hide events on my list of future events?
- Can I filter my list of future events by event name?
- How do I integrate the event registration on my website?
- What are the termination modalities of the packages?
How can I invite participants to events?
There are several ways to do this:
1. Send registration link
When creating the event, we sent an event registration link to the organizer email. You can send this link using whatever medium you choose.
2. Add more emails or invite groups
Go to "Events" -> "My Events" and click next to the event on this icon to edit the event.
On the second page (2. Participants) you can now enter further e-mails in the field "Send invitations to these e-mail addresses". If you are registered, you can also click on additional contact groups and invite them.
If you are not registered with Let's Meet, you can edit the event via the administration link. When you created the event, we sent you this link to the email address you provided.
3. Add people to invited groups
This variant only works if you are logged in to Let's Meet. Go to "Contacts" -> "Contact Groups" and click on the name of an invited group. Now click on and add the desired people to the group. Send invitations to these e-mail addresses
If the number of participants is not limited, they will receive the invitation within an hour.
How can I personalize invitations?
When creating an event, you can write the invitation e-mail. There, you can add placeholders like [Guest First Name] to the invitation. This placeholder will be automatically replaced by the name of the guest that receives the invitation.
Example: "[Salutation] [Guest Title] [Guest Last Name]," can be replaced by the following texts depending on the person who receives the invitation
- Dear Mrs. Doe,
- Dear Mr. Doe,
- Dear Sir or Madam, (no firstname and lastname provided)
Can I invite more participants after creating the event?
Yes, you can invite more groups or add new people to groups after you have created the event as described above. Every half hour (0:30, 1:30,...) all Let's Meet events are checked and if more people are added, they are invited. However, this only happens if there are still places available at the event.
Can I automatically invite my most important customers first?
If you are organising seminars or workshops, you may want to invite selected guests first and only invite more guests if there are few responses. With our invitation method Favorites First this is easily possible.
Let's take a look at a simple example of a course with 4 participants (see box below). Let's Meet first invites your most important customers. If there are still places available after a predefined period, the next round of invtations is sent out.
In the example below, new invitations are sent out after 3 days. Of course, Let's Meet allows you to define this interval yourself.
| Customers | Event created | Day 3 | Day 6 | Day 7 |
|---|---|---|---|---|
| Bobby | ||||
| Anna | ||||
| Johannes | ||||
| Tina | ||||
| Georg | ||||
| Martha | ||||
| Barbara | ||||
| Peter |
As there are still places available, Martha and Georg are now invited.
One place is still available, so Barbara and Peter are invited.
Tina and Georg have not responded, despite reminder emails.
How can I do this with Let's Meet?
Find out more in the section How can I define who is invited first?
Why haven't all my invitations been sent out yet?
If not all invitations were sent, this can be due to several reasons:
- Invitations are sent a maximum of 5 minutes after the event is created. If this time has not yet passed, you only have to wait a little.
- If you have created large event with many participants, invitations might be sent out in several batches. The maximum number of invitations per batch is currently 250. Hourly, another 250 invitations are then sent until all are delivered.
- You have added more contacts to the event, but the invitations haven't been sent yet? Let's Meet checks hourly if new contacts have been added and then sends the new invitations.
- If there were problems sending the mail, a small blue triangle will appear next to the contacts in the event participant list. An hour later, Let's Meet will again try to deliver the invitation. This is independent of whether you are a Premium user and invitations are sent via your mail server, or whether the mails are sent via Let's Meet.
Innovative invitation methods - how does it work?
Who is invited first depends on the invitation method. The invitation method can be selected when creating an event in step '2. Participants'. Let's discuss the invitation methods with the help of an example.
Example: A course with max. 20 participants
Invitations are sent to all given e-mail addresses and selected contact groups. Whoever signs up first will get a spot.
At the beginning all your most important customers with 3 stars are invited.
If there are still places available after the selected time period, all contacts with 2 stars are automatically invited in round 2 and with one star in round 3.
Advantage: The participants will not always be those who respond fastest.
20 group members are randomly chosen and receive invitations. As soon as someone cancels or does not respond within the time given, the next person is automatically invited. Each time, only as many people are invited as there are seats available. Requires a good response rate!
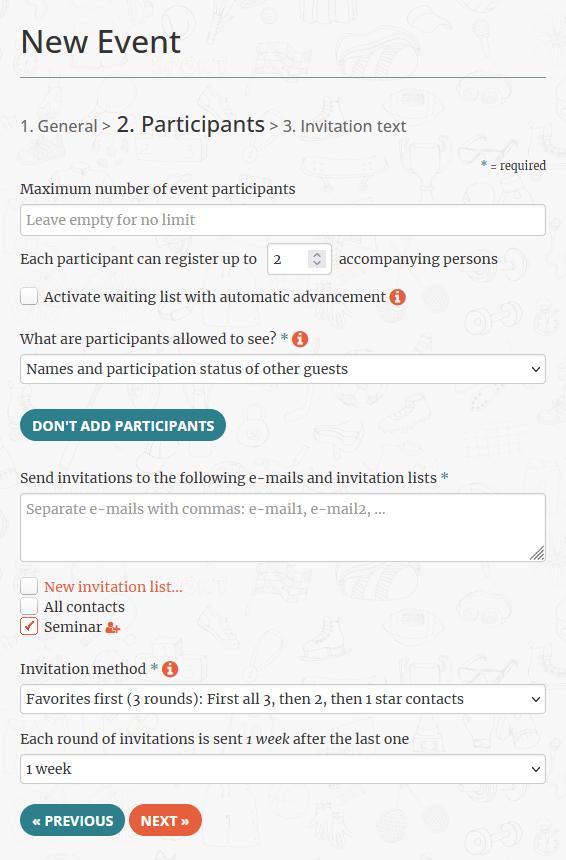
How can I define who is invited first?
Let's say there is a group named Seminar and you want to invite your most important customers first and after one week, if there are still places available for the event, you want to invite another batch.
1. Define contact preferences
To do this, first go to "Contacts" -> "Contact Groups" and click on this icon named "Add/Remove Members" for the desired group. You can now assign 1-3 stars to the contacts in this group. Contacts with more stars are invited first. In the screenshot below, Bobby is invited first, then Joe and finally Tina and Alex.

2. Create event with invite method "Favorites first (3 rounds)"
Once the group is saved, please create an event. After providing the event details like time and location, click on "Next". On the following page, click on "Add Participants" and invite the Seminar group you edited before. Finally, select the invitation method "Favorites first (3 rounds): First all 3, then 2, then 1 star contacts" and define that "Each round of invitations is sent 1 week after the last one" (screenshot below).
After saving the event, all three star contacts are directly invited. If there are still places available after one week, all two star contacts will be invited and after 2 weeks all 1 star contacts.
Please note that the group "All Contacts" always contains all your contacts. It cannot be changed and no stars can be assigned to the members of this group.
If an e-mail address appears in two invited groups, is the invitation sent twice?
No. For each event, a specific e-mail only receives one invitation.
Can interested parties register themselves for regular events?
Example: You organise a Pilates class every week on Monday. You want to make it possible for new people to sign up and receive invitations to the courses. Every week, your contact group "Pilates Monday" is invited to the course.
To open this group for new members, click on "Contacts" -> "Contact groups" and then on the icon "Edit group settings" next to the desired group.
You will now see the group settings as shown in the screenshot below. Click on the option "I want to invite people to join this group" and you will receive a link (marked in the screenshot). Save the group and send the link to interested parties or post it on your website. Your customers can then use this link to join the group themselves and will receive your invitations to upcoming Pilates classes.

I have unsubscribed from emails from an events organizer. How can I resubscribe to these invitations?
The easiest way is if you have a Let's Meet account with your email address. Then you can resubscribe to the organizer's invitations at https://lets-meet.org/new_unsubscription.
.Otherwise, you could look for an invitation email from this organizer and click on the unsubscription link to sign up again.
As an organizer, how can I manually add people to the participant list?
Go to "Events" -> "My Events" and click on the name of the event. Now you can simply add people to the participant list.
If you are not logged in, you can manage the participants via the administration link. We have sent this link to your e-mail when you created the event.
As an organizer, how can I permanently delete people from the participant list?
Deletion from the participant list is possible if the registration has been revoked or if it is a cancellation. Then you can simply delete the registration by clicking on the trash can icon .
If you want to remove an active registration, the registration must first be cancelled by clicking on this icon . The participant will then receive a cancellation e-mail. This process prevents a registration from simply disappearing without the participant knowing what happened to it.
In rare cases, it may be desired not to trigger a cancellation email. In this case, you can do the following:
Click on the pencil icon next to the registration in the participant list to edit it. Then set the number of participants to zero, enter delete@noemail.com as the email address and save the registration. This will cancel the registration, and no email will be sent to any email addresses ending with @noemail.com. In the second step, you can then permanently delete the registration by clicking on the trash can icon .
Can I filter the participant list to show only people who have accepted (or declined) the invitation?
You can filter the participant list using the search field above the list. Here you can search by name or email address, for example. If you enter "pers" in the search field, you will only see registered participants. If you enter "declined", you will only see participants who have canceled, "expired" will only show participants whose invitation has expired, etc.
Who should be able to see the participant list?
For each event, you can specify whether participants are allowed to see the guest list. When creating an event, this can be done on the second page "2. Participants" using the option "What are participants allowed to see?"
What options do I have and when is it best to use them?
In any case, registration information like e-mail addresses, surnames or telephone numbers are only visible for the organizer! Comments can only be displayed if a field named "Comment", "Notes" or "Comments / Wishes" exists.
The list of comments is visible for all participants. This overview helps greatly whenever people have to agree on who brings what.
Examples: jointly organized event or journey
Participants should be able to see who else is attending, but comments should only be visible for the organizer (e.g. reason for cancellation).
Examples: party, wedding
You want to hide cancellations so that no inferences can be made about the number of invitations.
The participant list should not be public but you want to inform guests about the number of remaining places.
Examples: seminar, yoga class
You don't want to reveal any information about participant numbers or the guests.
Examples: online seminar, exclusive event
How can I view participation statistics for multiple events?
Under the menu item "Events" -> Download participation statistics, you can export statistics regarding event registrations for all your events to Excel. You will find the following sheets in the Excel file:
- A list of all your events with participant numbers and key event data (times, location, number of participants, etc.)
- In a second sheet, you will find a table listing everybody who has participated in one of your events. The participant number for each event is noted in the columns.
- Another sheet contains data on the event check-in status of all participants per event.
Participation statistics for a group of events using event template
If you need participation statistics for a specific group of events, you can create an event template for this event group. If you then use this template for new events, you can export participation statistics for all events that were created with this template. This works in exactly the same way as described above for event series. Please go to your event templates and click on this symbol for the relevant event template to export participation data for all events created with this template.
Similar to the explanation above for all events, you will find three sheets in the Excel file covering the event list, participation as well as check-in information. If you select the CSV format, you will receive the 2nd sheet with the participation information as a comma-separated text file.
Analysis of participation for events in an event series
You can also carry out a similar analysis for specific event series. To do this, go to your event series and click on this symbol for the relevant event series. This will download the participation statistics for all events which are part of this event series.
I have no e-mail address or do not want to use my private one
Your e-mail address is safe with us. Our privacy policy states that we may only send information about our products to users with a Let's Meet account and not to persons who just registered for events.
You still don't want to use your e-mail address or don't have one?
Please choose from one of the following options
- Provide an e-mail ending with @noemail.com e.g. jane.doe@noemail.com. You can use it to sign up, but no e-mail will be sent by us.
- Use an anonymous e-mail service such as Mailinator e.g. with jessica.doe@mailinator.com
After completing the event registration, a personal update link will be displayed. Please save this link in case you want to update your registration later.
Important: We kindly ask you not to enter a wrong e-mail address, as this will lead to our e-mails being classified as spam for other users.
Why is my email address shown as invalid?
Problem description: If you try to register for an event, you might see the following error message: Please use a real e-mail address or add @noemail.com to the name. In this case we will not send an email.
This error message may appear for two reasons:
- An e-mail could not be delivered to the provided address in the past. If your mail server returned that the existing email does not exist or delivery from our mail server is not possible, the e-mail address is marked as invalid. This does not happen if e.g. the mailbox was only full and delivery was temporarily not possible because of that.
- The internet domain (text after the @) does not exist. This means, that the e-mail address is also invalid.
Solution in the first case: If the issue is resolved and delivery is possible again, you can send us an email from the affected address to office@lets-meet.org for a new activation. However, if delivery fails again, the address will be marked as invalid again.
I want to allow multiple registrations with one e-mail address
As part of all paid Let's Meet packages, you can edit the registration page of your events. To allow multiple registrations with one email address, log in to Let's Meet and go to "My Events" in the menu, then click on the brush next to the heading "Events".
You will land on the page "Default design & registration fields" and below the field "E-Mail Address" you now have the option "Multiple registrations with same e-mail possible". If you enable this, a person can register multiple participants with one email address. Alternatively, you could define a "Names of accompanying persons" field where all accompanying persons can be recorded by name.
You can also make the email address field optional by not defining it as a required field (checkbox with star on the right). This makes it possible to register without an email address as well. In this case, however, participation information regarding the event (such as a zoom link) cannot be sent to these participants!
How does the waiting list work and where can I activate it?
This feature is included in Let's Meet Premium and Premium Lite.
If you activate the waiting list, participants will be forwarded to the waiting list in case the event is already fully booked. Once registered, they will automatically receive an e-mail notification as soon as a place becomes available.
You can also increase the maximum participant number of an event to allow people on the waiting list to participate. We check all waiting list events ever 15 minutes and send out notifications to participants in case of available spots.
Where can I activate the waiting list?
When creating or editing an event, tick the box "Activate waiting list with automatic advancement" (below the maximum number of participants).
Using the waiting list, you can now keep track of the actual interest in your fully booked events!
Preselection of participants
You can use the waiting list function to pre-select participants. More information can be found here.
Can I preselect event participants?
With the Premium and Premium Lite packages, you can use the waiting list function to pre-select participants. To do this, create an event, activate the waiting list and set the maximum number of participants to zero.
All those invited will then see the following message: "You can currently only pre-register for the event via a waiting list. If you put your name on the list, you will be informed automatically as soon as a place is available for you.". When people register for such an event, no waiting list position will be displayed, as this is misleading if you are pre-selecting participants anyways.
In addition, you can name the event e.g. "Seminar XYZ pre-registration" to make it clear that it is only a pre-registration.
As soon as all registrations are in, you can sort out participants and send cancellations. Afterwards, rename the event to "Seminar XYZ". If you then increase the number of participants, the available places will be checked every 15 minutes and all participants left on the waiting list will then automatically receive confirmations if there are enough places available.
How long can participants register for events or cancel their participation?
Registration for the event is possible until the specified registration deadline. The deadline can be set to the end of the event to allow registration during the event. If no registration deadline is specified, registration is possible until the start of the event.
Modification of existing registrations by participants
In case of changes, participants can edit their registration. For example, they can cancel their participation in case of illness or specify that more or fewer accompanying persons are coming. If no registration deadline is specified, participants can change their registration until the start of the event.
Cancellation after deadline
If you define a registration deadline and select the option "Cancellation is possible after the deadline until 24 hrs before start", a cancellation is also possible after the deadline until 24 hours before the event. Otherwise, no changes are possible after the deadline. If the deadline is less than 24 hours before the start, cancellation are never possible afterwards.
Important: In case participation infos are sent out, participants cannot change their registrations within 24 hours of the event.
Organizers can of course change registrations at any time!
Can participants still register during the event (after the event has started)?
Yes, you can allow participants to register during the event. When creating the event, you just need to set the registration deadline to the end of the event.
How does the check-in work?
The check-in feature is available for Premium and Premium Lite customers and allows the organizer to track the actual attendance. After all, not everybody who has registered for the event actually shows up. There are two options available for checkin:
- With one click on the check-in button on the left side of the participant list, you can check in guests at the entrance.
- Alternatively, you can use the check-in via QR code (activation in your account settings). In this case, the participants will receive a QR code via e-mail with the registration confirmation and the event reminder. At the event, the organizers can then scan the QR code e.g. with a mobile phone. When they go to the web address stored in the QR code, the participant(s) will be checked in.
You can, of course, use both options the same time. Check-in begins three hours before the event starts. If you have other requirements, please write to us at office@lets-meet.org.
Where can I find the QR code for event registration and how does it work?
As an organizer, you can find the QR code on the administration page of each event, where you manage the participant list. There, click on the QR code icon at the top, to the right of the event name.
To get to the event administration page, go to your event overview as a logged-in user and click on the event name. If you don't have a Let's Meet account, please click on the administration link in the email that you received when creating the event.
How does the QR code work?
When your customers scan the QR code with their smartphones, they will immediately be taken to the event registration page. This is convenient for on-site registration and can also be included when advertising the event. People interested in your ad can scan the QR code e.g. on the poster and immediately reach the event registration page.
How can I add registration fields?
As part of all paid Let's Meet packages, you can edit the registration fields for your events. To customize the registration fields for all events, log in to Let's Meet and go to "My Events" in the menu, then click on the brush next to the heading "Events".
You will reach the page "Default design & registration fields" and can now edit your registration fields. If you scroll down, you will see the item "Add and define additional registration fields".
Click the plus to add more registration fields.
- First enter the name of the custom field. Some field names like company or phone number are already provided and selectable. These field names are also translated to another language if the event registration is done e.g. in German.
- To the right of the custom field name you can click a checkbox. This box allows you to determine whether this is a mandatory field that must be filled out by all participants.
- You can then select the response type. Participants can provide the information in a single or multi-line text field, or select the response from a list.
In case of a list, please specify the list options separated by semicolons e.g.:
Menu 1: Salmon with potatoes;Menu 2: Mushroom risotto
You can repeat these steps and add more registration fields.
You want to store different registration fields for different events/event series? You can find more information about this here.
How can I customize the design of my events?
As part of all paid Let's Meet packages, you can customize the designs of your events. To customize the default design, log in to Let's Meet and go to "My Events" in the menu, then click on the brush next to the heading "Events".
You reach the page "Default design & registration fields" and can now edit the default design for all your events. All colored elements can be edited.
- Click on links and buttons to change their colors. In the screenshot below you can see the menu for changing icon colors.
- For colored areas in the registration forumlar you can click on the brush to select a color.
- To insert an image for the top of the registration page, click the image icon above the logo.
- Click on the logo to add your own logo.
The design you create will affect event registration pages as well as event emails.
You want to store different registration fields for different events/event series? You can find more information about this here.

Can I store different designs and registration fields for different events, templates or series?
Yes, you can create as many event designs with registration fields as you like with the paid Let's Meet packages. You can add these designs to templates, event series or even individual events. Click on the brush at the desired element (event, series, template) to edit the design and the registration fields (screenshot).

The following rules apply:
- If only the default design is stored, this will be used for all templates, series and events.
- If you have saved a design for an event template, this design will be copied for all events created with this template.
- If you have saved a design for an event series, the design will be copied for all events that are automatically created as part of the event series.
- In addition, you can change the design and registration fields of a single event at any time. If this event is part of an event series, only the design of the individual event will be changed and not that of the entire series.
- On the other hand, if the design of the template or event series used is changed after the event has been created, the design and the registration fields of an event will no longer change.
Why are some fields on the event registration page already filled out?
When you are logged in with your Let's Meet user, each event registration page will automatically fill out email, first name, and last name from your user. Once you log out, this is no longer the case. Of course, your customers do not see this page pre-filled with your information.
What are the dimensions of the event image?
The event image will be cropped to 1920x480 pixel. When uploading, the maximum allowed size of the image is 4000x3000 (max 3.5 MB) and the file formats JPG, PNG, GIF and SVG are supported.
How can I change the small round image below the time of each event?
The image shown is your profile picture. To change it, please go to your "Account settings" in the menu and click on the image to the left of the heading. Here is a shortcut.
I receive so many e-mails - can I deactivate them?
As a logged in user, you can specify in your profile under "Let's Meet e-mail settings" which emails you want to receive from Let's Meet. You can disable registration confirmation emails and event reminders and only receive an email in case participation infos are sent out (e.g. a link to the online meeting). Furthermore, as an organizer, you can specify whether you want to receive admin and registration links via email after event creation.
How can I automatically send the link to my online meeting to all participants?
This feature is included in Let's Meet Premium and Premium Lite.
You can automatically send confirmed participants further information about the event. This is especially handy for online meetings. Let's Meet will send the link to your online meeting only to people who have confirmed their participation in the event.
When do participants receive this information?
The participation information is sent to all confirmed participants together with the reminder shortly before the event. You can specify in your profile when this reminder email should be sent.
The participation infos will be sent directly with the registration confirmation email if...
- people register after the reminder ist sent
- you have specified that no event reminder should be sent
- the event is only created less than two days before the start of the event
Important: If participation infos are sent more than 24 hours before the event, guests will receive access data for the event and can then still cancel their participation until 24 hours before the start unless you set a different registration deadline!
How do I add participation information to an event?
Create a new or edit an existing event. Directly below the event details, check the item "Send participation info shortly before event (e.g. link to the meeting)" and enter the information you want.
Can I define the text of the confirmation emails myself?
The confirmation emails are automatically generated and contain various information depending on the participant's reply (accepted invitation, cancellation, number of participants changed, registration revoked by organizer, event canceled, ...). It is not possible for you to completely design all these emails.
However, the text of the confirmation e-mails can be partially customized by you. These three parts can be edited by you:
- All information regarding the event such as time and location as well as the event description (details / program) are included in the confirmation emails and can be changed by you.
- You can specify event participation information when creating the event. This information (such as the zoom link to a meeting) will be sent to all registered participants shortly before the event. This is possible with the Let's Meet Premium and Premium Lite packages. You can find more information on this topic here.
- The end of the confirmation emails is changed to "Best regards Your Name", if the emails are sent via your own mail server with Let's Meet Premium.
If, however, confirmation e-mails are sent via Let's Meet mail servers, the e-mail always ends with "Best regards Your Let's Meet Team". The main reason for this is that many event participants reply to the confirmation emails and send their reply to our support, when they actually want to contact the organizer. Therefore, we don't want to reinforce the appearance that the email is coming directly from the organizer (more on this here).
How can I contact the event organizer?
On the event registration page you will find the e-mail address of the organizer. You will also find this address in every invitation email and registration confirmation.
If you respond directly to an invitation, the email will be sent to Let's Meet Support. A direct reply to the organizer is not possible.
Why is it not possible?
E-mails more often end up in the spam folder, if the e-mail sender and the reply address are from different domains (example: the e-mail comes from adviser@mybank.com and the reply goes to hacker@spam.com).
When does Let's Meet send out reminders?
Event reminder
Event reminders are sent to all persons who have registered for the event. By default, this happens 1 day before the start of the event, but you can customize the time in your settings. If a participant has cancelled or not responded to the invitation, he will not receive a reminder.
You can also deactivate the reminder e-mail when editing a specific event or template. Moreover, if the event was created less than 2 days before the start of the event, no reminder will be sent because people have only just registered.
Invitation reminder
If invitations are sent via Let's Meet, invitation reminders will be sent. People who have not responded to the invitation are reminded to let the organiser know if they are able to attend. These reminders are sent when 2/3 of the response time has elapsed and there is still no response (response time: time between the invitation being sent and the registration deadline/event start).
The reminders are of course only sent if registration for the event is still possible and the maximum number of participants has not yet been reached. In your settings, you can also specify the minimum response time required for invitation reminders to be sent at all. If the response time for an event is less than two days, invitation reminders will never be sent because we do not want to flood participants with emails.
Example: On the 1st of May the organizer creates a workshop event that takes place on the 31st of May (30 days later). Everyone who has not registered after 20 days (on May 21th) will be reminded of the invitation.
How is the limit for event registrations and invitations calculated?
The use of Let's Meet in the free version is limited to 100 event registrations and event invitations per month.
All invitations you have sent this month count towards the limit. Also included are registrations for your events that were made via the general event registration link and without a personal invitation. Registered participants who have also received an invitation will of course not be counted twice. Likewise, participants who accept and decline invitations more than once will only be counted once.
With the basic package, up to 350 event registrations or invitations per month are possible. For Let's Meet Premium Lite customers, the limit is 700 and with Premium it is 1000 event registrations or invitations per month. If you need a higher limit, you can purchase additional event registrations or invitations per month.
Detailed Infos
- People who register and deregister for an event multiple times will only be counted once.
- Registrations count per event, i.e. if a person registers for 5 events, it counts as 5 registrations.
- If accompanying persons are specified in a registration, it still only counts as one registration.
- People who have not received an invitation and decline their participation via the general event registration link are not included in the limit.
A brief example to explain
You send an invitation to one of your events to 20 people. 10 of these people register for the event. In addition, 5 people register via the general event registration link you posted on your website. You have now used 20 event invitations and 5 event registrations, making a total of 25. The 10 people who were invited first and then registered will not be counted twice.
Furthermore, if the participant number is set to 3 participants for one registration, this will only be counted as one registration!
What can you offer for multiple organizers managing events?
For companies and associations with several organizers, we currently offer two different Premium Enterprise packages
Premium Enterprise (up to 10 Premium Accounts)
The first variant is simply a discount on several Premium packages. This allows you to create and use up to 10 separate premium accounts with a huge discount for the price of 1099 EUR net / year. The respective accounts can then manage events independently of each other. The one-off set-up costs in this case amount to a total of 249 EUR net instead of 99 EUR per account. The package can be ordered in the login section.
Premium Enterprise (different organizers e-mails)
With the second variant of the Premium Enterprise package, all organizers log in to the same account. They can create and manage their events at the same time, as well as access the same contact list and templates. For each event, a different organizer e-mail can be specified and thus the contact point for enquiries can be changed. You can also specify a restriction here, e.g. that only e-mail addresses of a certain domain are permitted as organizer e-mails.
If you want to send links to specific event group to customers (e.g. only yoga courses), you can filter your event list.
The price is 1099 EUR net / year and the one-off setup costs are 99 EUR. The package can be ordered in the login section.
Does my free trial period for the basic package end automatically?
Yes, the trial period ends automatically after 14 days without any cost to you. We unlock this trial period when you create a account, so you can try out most of the features yourself, such as designing events and adding registration fields.
Can I hide events on my list of future events?
With Let's Meet Premium and Premium Lite you can send out a list of all your future events to customers. If you want to hide internal events from your customers, please go to your event list at https://lets-meet.org/upcoming and click the eye icon . After that, the event will no longer be displayed to customers on your event list.
Can I filter my list of future events by event name?
You can filter your event list by event name. This allows you to send a link with very specific courses to interested people or you can put it on your website.
The list will be filtered by event name if you append "?name=..." to the web address.
An example: this link https://lets-meet.org/events/my-lets-meet-link?name=seminar will display all events whose name contains "Seminar". The unfiltered list contains other events https://lets-meet.org/events/my-lets-meet-link which are filtered out. Upper and lower case are not important for the filter, but only letters are allowed - no umlauts, spaces or numbers.
Create a link that jumps to the registration of the next seminar
You can create a link that always jumps to the registration of the next event in your list. To do this, you need to append "?jump_to_first_event=1" to the address.
An example: using this link https://lets-meet.org/events/my-lets-meet-link?jump_to_first_event=1 you will immediately jump to the registration of the first event in your list. You can place such a link on your website and never have to change it again!
Of course, you can also combine this with a filter. If you want to redirect to the registration of the first event with "Data" in its name, you can use the following link: https://lets-meet.org/events/my-lets-meet-link?name=data&jump_to_first_event=1
How do I integrate the event registration on my website?
Let's Meet Premium allows you to easily intergrate the event registration on your website. To integrate a single event, just paste the italic lines below on your website (within the <body>). Replace the blue event registration code with the code of your event. Done!
Example for the code from an event registration link:
https://lets-meet.org/reg/f3483128e09901658bd0
<iframe id="letsmeet_iframe" src="https://lets-meet.org/reg_embedded/f3483128e09901658bd0" style="width: 1px; min-width: 100%; border:0;" onload="iFrameResize({ log: true, heightCalculationMethod: 'bodyScroll' }, '#letsmeet_iframe');"></iframe>
<script src="https://cdnjs.cloudflare.com/ajax/libs/iframe-resizer/4.0.4/iframeResizer.min.js"></script>
You can also adapt the colors and the font of the registration pages to your corporate identity and insert your own terms and conditions.
You can find all the information you need in this PDF guide for integrating the event registration on your own website.
What are the termination modalities of the packages?
Depending on the setting in your profile profile, your package will either renew automatically or it will end after one year. If you don't want any interruption in our service, automatic renewal is recommended.
.Otherwise, no cancellation is necessary on your part, the package will end automatically. However, you will receive an e-mail reminder 1 and 2 weeks before the package expires in order to ensure that there are e.g. no interruptions regarding the integration on your website because you are set back to a free account.
If you wish to cancel an order, you can do so within 14 days.
How can I delete my account?
At the bottom of your profil you find the button DELETE ACCOUNT. Click on the button and confirm the deletion. After that, your account with all associated events, event series, templates, contacts, groups and settings is deleted.
How do I subscribe to my event calendar?
In only a few steps you can automatically add your Let's Meet Events to your personal calendar.
Please log in so that we can show you how to import your own personal calendar. After the login, click on the calendar symbol next to the heading "Events".
Why is the event time in the calendar entry wrong?
If the event time in the calendar entry does not match the start time you specified, this is due to the time zone. Let's Meet automatically determines the time zone. This happens either during registration or, if you are not logged in, when you create an event. If the time zone cannot be determined e.g. because this is blocked by the browser, UTC is used as time zone. If this is not the correct time zone, the time in the calendar entry will not be correct.
Solution
As a logged-in user, you can change the time zone in your profile. Select the correct time zone and save the changes with your password. If you created the event without logging in, simply create an account on Let's Meet and correct the time zone in your profile. Now you can recreate the event with the correct time zone or correct the existing event.
Correcting the time zone of an existing event
A change to the time zone in the profile is automatically applied to all events that you have created as a logged in user.
If you have created an event without login and are now logged in with the event organizer's e-mail, you can also easily correct the time zone. After changing the time zone in the profile, simply edit the event and save it (even without changes). This automatically corrects the time zone.
Why can some events be deleted, others only cancelled?
Past events and those without participants can be deleted.
Future events with at least one participant can only be cancelled. Hereby, a cancellation e-mail is sent to all participants.
If these events could be deleted, the participants would not know why the event has disappeared from their calendar or event list.
How can I save an event as a template?
When you create or edit and save an event, a button "Save event as template" appears. This saves the event and the design with the registration fields (if available) as a new template.
How do I import contacts?
What does contact import mean and how does it work?
There are standardized formats which allow you to copy contacts from one program to another. In order to do this, you need to first save the contacts from your e-mail or cell phone address book into a text file. This process is called exporting. The file you have exported can then be imported by other programs like Let's Meet.
Below you will find instructions on how to export your contacts from the most common applications (Apple Mail, Outlook, Thunderbird, Excel, ...) into CSV format.
Contact import at Let's Meet
- To import the contacts at Let's Meet, please first select the contact file from your hard drive.
- Select the character that separates the values. If you are not sure, simply use "automatically determine". In the English-speaking countries "comma" is usually used, German-speaking countries and other European countries often use "semicolon".
- Now select the import program from which you want to transfer the contacts (e.g. Outlook 2016, Thunderbird, ...). If you have saved the contacts from a custom Excel list as CSV file, choose "Custom Excel list". If the program you are importing from is none of the listed programs, please select "None of the above programs".
- Click on "Upload file". You will now be asked to select the correct columns for First Name, Last Name and E-mail. If you have specified the import program, the column selection should already be correct. If you are exporting from Excel lists or other programs, please select the correct columns. Then click on "Import contacts".
- Finished! Now you should receive the message "Contact import completed" and a message telling you how many contacts have been added or updated.
You need help exporting your contacts from a program?
From which program/device are you exporting your contacts?
- Apple Mail Address Book (link to other website)
- Google (Android)
- Microsoft Outlook (link to Microsoft Support)
- Microsoft Outlook for Mac (link to Microsoft Support)
- Mozilla Thunderbird
Google (Android)
- Go to Google Contacts
- To select contacts, check the boxes that appear next to their names
- Click "More" > "Export"
- Choose a location for the file that you remember for the import to Let's Meet
- Select "Google CSV" and click "Export" to save your file
Thunderbird
- Open the Address Book by clicking on "Tools" > "Address Book"
- The Address Book with your list of contacts will open. In the Address Book, go to "Tools" > "Export"
- Choose a location for the file that you remember for the import to Let's Meet
- Select CSV "Comma Separated Values" format and click "Save"
Where can I find the last release notes?
Here are the last two release notes:
We wish you a Merry Christmas and are excited to present you a festive bundle of new features!
- You can now enter additional information such as title, telephone number and organization for your contacts. The new notes field can be used to assign topics to contacts.
- The event statistics can now be restricted to a specific time frame, and an issue with concurrent events has been resolved.
- The print view of the participant list and many other pages has been improved.
- You can now easily reduce the participant limit for fully booked events. The last registrations are automatically moved to the waiting list and notified (waiting list is available for Premium and Premium Lite customers).
- Conversely, you can increase the participant limit and then use this button to manually advance people from the waiting list (particularly useful when working with event pre-registrations).
- Fixed bugs and small improvements
- Invitation editor: Fixed issue with selecting font size and font background color
- When assigning contacts to groups, only visible contacts are selected when clicking "Select All", making it easier to filter by the new fields through the search.
- The contact import enables the import of the new fields and now better recognizes the character set used. This means that special characters can be better processed.
- If you have stored your own font with the premium package, it will now be used not only on your website but also on the Let's Meet event registration page.
Happy holidays and enjoy the new features!
We have now realised a long-awaited customer request, the daily event report. You can activate the report in your settings. It is sent via e-mail and gives you a daily overview of participation numbers for your upcoming events. The e-mail with the report also contains information on changes in attendance within the last 24 hours. The e-mail will only be sent if there has been at least one change in attendance within the last day. It is available for Premium and Premium Lite customers and feedback on this report is very welcome!
Another change we implemented: when viewing the event participant list, you can now copy the emails of all confirmed participants to the clipboard with a single click on this icon . Incorrect emails are automatically filtered out.
Where do I find a list of all the hints?
Here is a list of all the hints that are displayed on your 'Events' page:- Delete multiple contacts at the same time by going to your contacts page and clicking on the symbol next to the heading.
- Edit multiple contacts at the same time by going to your contacts page and clicking on the symbol next to the heading.
- Edit the default event design by clicking on the paint brush at the top next to the heading.
- You can allow event registrations without an email address.
- You can enable multiple event registrations with the same email address.
- To repeat an event regularly, click on this icon
- Subscribe to a calendar with all the latest information about your events using this icon located above
- Your customers can join a contact group to receive invitations to this group. To get the group link, edit the contact group and click on 'I want to invite people to join this group'.
- The invitation method Favorites first (3 rounds) invites your contacts with 3 stars first .
If there are still places available after the selected time period, all contacts with 2 stars will be automatically invited in round 2, etc. - You can easily import contacts from Outlook, Thunderbird, etc. To do this, click on the symbol next to the heading.
- Contact suggestions can be found under this link
- Create similar events faster with event templates.
- The design of event series and event templates is automatically used for the created events.
- If you specify a second administrator for a contact group, this user can also edit the group members.
- With shared groups, all group members can send invitations to the group.
- You can add additional guests to the event at any time via contact groups or emails. There's more information here.
- When creating an event, you can specify how many accompanying persons can be registered per invitation.
- When creating an event, you can specify whether participants are allowed to see the guest list or not.
- As the event organizer, you want a list of all event participants? Click on the download symbol above the participant list
- You can download registration statistics for all your events here.
- You can download event statistics for all your event series and templates to see who took part across multiple events.
- Send a message to the event participants by going to the event and clicking the message icon .
- You can change the small round image below the time of each event in your account settings.
- You can unsubscribe from invitations of specific organizers using this Link.
- You no longer want to receive a confirmation email every time you register for an event?
- You do not want to receive a reminder email before the event?
- After creating an event, you do not want to receive an email with admin and registration links?
- Event reminders will be sent to all participants 1 day before the start of the event, unless the event was created less than 2 days before the start.
- Invitation reminders will be sent out after 2/3 of the time between the invitation and the registration deadline has elapsed.
- You can deactivate the reminder emails that are sent one day before the event in the templates or for entire event series.
- Ask participants for further information at registration (company name, telephone number,...) with our basic package
- Define custom registration fields to ask e.g. if participants are beginners or advanced with our basic package.
- Define custom registration fields for your event registration page using our paid services.
- Send a list of all your upcoming events to customers with Let's Meet Premium Lite.
- Filter your event list by event name to send a link with specific courses to interested parties.
- Create a link that always jumps to the registration for the next upcoming course in a series.
- Integrate the Let's Meet event registration on your own website with Let's Meet Premium.
- Let's Meet can automatically send all confirmed participants your access link to the online meeting shortly before the start of the event.
- Send invitations and confirmation emails directly via your mail server with Let's Meet Premium.
- Do you need a package for multiple organizers? Further information can be found here.
- With the Premium Enterprise package, multiple organizers can edit events at the same time!
- With the Premium Enterprise package, different organizers/contact persons can be defined for each event.
- Activate the waiting list so that participants can register there in case your event is fully booked. As soon as a place becomes available, we will automatically inform the next person on the waiting list via email (starting from Let's Meet Premium Lite).
- You can use the new waiting list function to pre-select participants. To do this, create an event, activate the waiting list and set the maximum number of participants to zero. More information can be found here.
- You can enable check-in via QR-code for your events (starting from Let's Meet Premium Lite).
- Check-in QR-codes are sent with the registration confirmation and the reminder e-mail before the event.